پروکسی / اچ ای
پیکربندی Load Balancing Server با استفاده از HAProxy در لینوکسLoad Balancing یا متعادلسازی بار، یکی از مهمترین مفاهیم در زیرساختهای وب مدرن است. این کار باعث میشود که ترافیک کاربران بین چند سرور توزیع شود و فشار از روی یک سیستم برداشته شود. در این مثال، ما از HAProxy به عنوان Load Balancer استفاده میکنیم تا درخواستها را بین دو وبسرور مختلف پخش کند. برای پیکربندی Load Balancing Server، HAProxy را نصب کنید .این مثال بر اساس محیطی مانند زیر است. -----------+---------------------------+--------------------------+------------
| | |
|10.0.0.30 |10.0.0.51 |10.0.0.52
+----------+-----------+ +-----------+----------+ +-----------+----------+
| [ dlp.srv.world ] | | [ node01.srv.world ] | | [ node02.srv.world ] |
| HAProxy | | Web Server#1 | | Web Server#2 |
+----------------------+ +----------------------+ +----------------------+
|
.Configure Servers that HTTP connection to HAProxy Server is forwarded to backend Web Servers | |
| [1] | ابتدا اچ ای پراکسی را نصب کنید. |
[root@dlp ~]# dnf -y install haproxy
| [2] | HAProxy را پیکربندی کنید. |
[root@dlp ~]#vi /etc/haproxy/haproxy.cfg # comment out all for existing [frontend ***] [backend ***] sections # and add follows to the end # define frontend ( any name is OK for [http-in] ) frontend http-in # listen 80 port bind *:80 # set default backend default_backend backend_servers # send X-Forwarded-For header option forwardfor # define backend backend backend_servers # balance with roundrobin balance roundrobin # define backend servers server node01 10.0.0.51:80 check server node02 10.0.0.52:80 check [root@dlp ~]# systemctl فعال –now haproxy |
| [3] | اگر فایروال در حال اجرا است، به پورت هایی اجازه دهید که HAProxy گوش می دهد. |
[root@dlp ~]# firewall-cmd –add-service=http
success
[root@dlp ~]# firewall-cmd –runtime-to-permanent
success
| [4] | با تنظیم پیشفرض HAproxy، گزارشها به ارسال میشوند [local2] تسهیلات، بنابراین Rsyslog را پیکربندی کنید تا آن را در یک فایل ضبط کند. |
[root@dlp ~]# vi /etc/rsyslog.conf
module(load=”imudp”) # needs to be done just once
input(type=”imudp” port=”514″)
*.info;mail.none;authpriv.none;cron.none;local2.none    /var/log/messages
local2.*                                                /var/log/haproxy.log
[root@dlp ~]# systemctl restart rsyslog
| [5] | تنظیمات سرورهای وب Backend (Apache httpd در این مثال) را به Logging X-Forwarded-For header تغییر دهید. |
LogFormat ” \”%{X-Forwarded-For}i\” %l %u %t \”%r\” %>s %b \”%{Referer}i\” \”%{User-Agent}i\”” combined
[root@node01 ~]# systemctl restart httpd
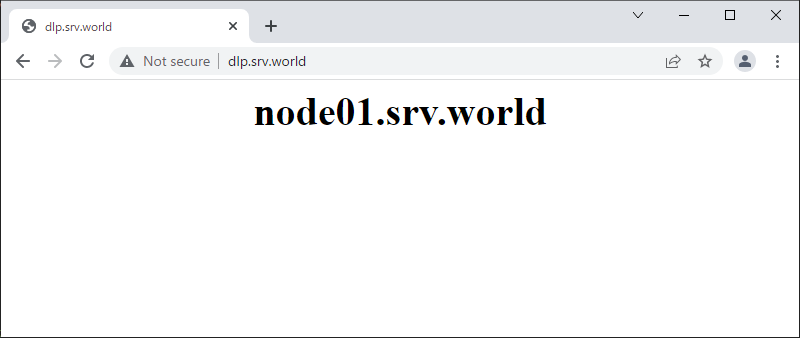
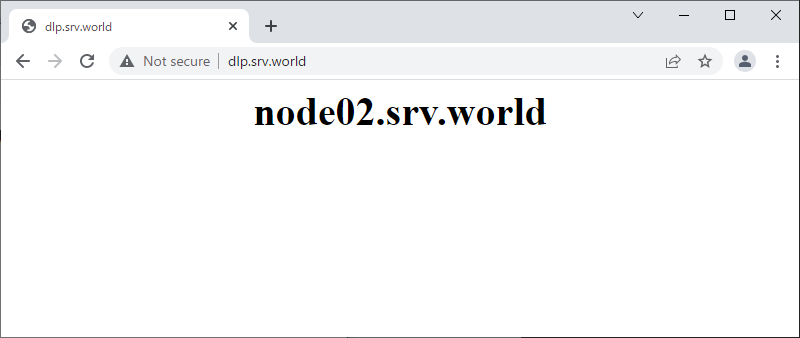
| [6] | HAproxy frontend بررسی کنید که به طور عادی کار می کندبرای دسترسی به سرور . |
|
 |